- Регистрация
- 9 Май 2015
- Сообщения
- 1,486
- Баллы
- 155
Intro
If you’re developing in C++ and looking for a powerful, flexible, and highly customizable data grid solution, then is the perfect choice. In this blog, we'll walk you through the process of getting started with the TMS FNC Data Grid, introducing its key features and demonstrating how to implement it in your C++ application.
What is TMS FNC Data Grid?
To have a better understanding on what TMS FNC Data Grid is and has to offer, please read through first.
Step 1: Installing TMS FNC Data Grid
Before you can use the TMS FNC Data Grid, you need to install the , which includes the Data Grid and many other useful UI components.
Step 2: Adding TMS FNC Data Grid to Your Form
Let’s dive into the basics of adding a TMS FNC Data Grid to your C++ form.
Step 3: Basic Grid Setup and Population
Now that you have the TMS FNC Data Grid on your form, let’s add some basic data.
Configuring Columns and Rows
The grid is flexible in how you manage its data. You can add rows and columns either programmatically or via design-time configuration.
Here’s how to add columns and rows programmatically:
void __fastcall TForm5::FormCreate(TObject *Sender)
{
// Set the number of columns and rows
Grid->ColumnCount = 5;
Grid->RowCount = 10;
// Define headers for the columns
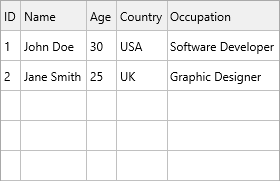
Grid->Strings[0][0] = "ID";
Grid->Strings[1][0] = "Name";
Grid->Strings[2][0] = "Age";
Grid->Strings[3][0] = "Country";
Grid->Strings[4][0] = "Occupation";
// Add some sample data
Grid->Strings[0][1] = "1";
Grid->Strings[1][1] = "John Doe";
Grid->Strings[2][1] = "30";
Grid->Strings[3][1] = "USA";
Grid->Strings[4][1] = "Software Developer";
Grid->Strings[0][2] = "2";
Grid->Strings[1][2] = "Jane Smith";
Grid->Strings[2][2] = "25";
Grid->Strings[3][2] = "UK";
Grid->Strings[4][2] = "Graphic Designer";
}
Auto Sizing Columns
TMS FNC Data Grid can automatically resize columns to fit content, making your grid look polished without much manual intervention:
void __fastcall TForm5::FormCreate(TObject *Sender)
{
// ... other grid setup code ...
Grid->AutoSizeColumns();
}
This method adjusts the width of each column based on the content, ensuring a clean layout.
Step 4: Adding Interactivity: Sorting and Filtering
One of the strengths of TMS FNC Data Grid is its built-in interactivity features like sorting and filtering.
Sorting
You can easily enable sorting by clicking on column headers.
Grid->Options->Sorting->Enabled = True;
Filtering
To add filtering, you can use the built-in filter feature:
void __fastcall TForm5::FormCreate(TObject *Sender)
{
Grid->Filter->Add(1, "Jane*"); // Filter the 'Name' column for 'Jane'
Grid->ApplyFilter();
}
In this example, we filter the second column (Name) for rows containing "Jane".
Step 5: Exporting Data
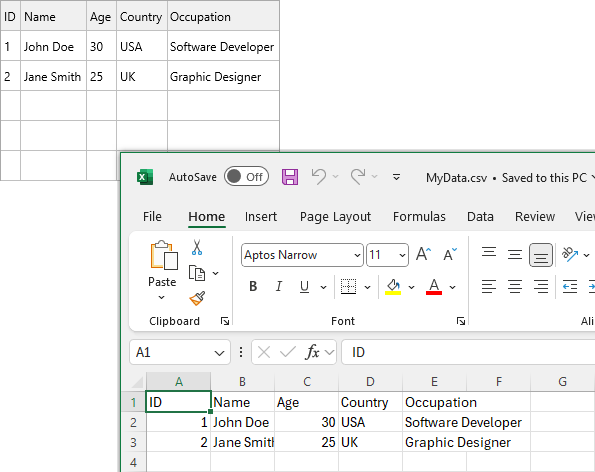
Exporting the grid data to various formats is as simple as a single line of code. Here’s how to export to CSV:
Grid->SaveToCSVData("MyGridData.csv");
You can also export to other formats such as PDF or HTML, giving you the flexibility to share or store data in different formats.
Conclusion
The TMS FNC Data Grid is a powerful and flexible component for C++ developers, offering extensive features for displaying, managing, and interacting with data. Whether you're building a desktop, mobile or web application, this grid can handle a wide range of data scenarios while providing a sleek, modern user interface.
In this blog, we’ve covered the basics of setting up and using TMS FNC Data Grid, but its capabilities go far beyond what we’ve shown here. We encourage you to explore its features to fully unlock its potential in your applications.
If you’re developing in C++ and looking for a powerful, flexible, and highly customizable data grid solution, then is the perfect choice. In this blog, we'll walk you through the process of getting started with the TMS FNC Data Grid, introducing its key features and demonstrating how to implement it in your C++ application.
What is TMS FNC Data Grid?
To have a better understanding on what TMS FNC Data Grid is and has to offer, please read through first.
Step 1: Installing TMS FNC Data Grid
Before you can use the TMS FNC Data Grid, you need to install the , which includes the Data Grid and many other useful UI components.
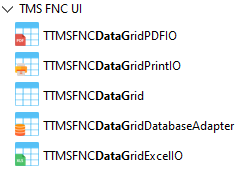
- Download and Install TMS FNC UI Pack:
- Visit the "My Products" page, or download TMS FNC UI Pack via your favorite installation method, Subscription Manager or
- Follow the installation instructions for your RAD Studio version.
Step 2: Adding TMS FNC Data Grid to Your Form
Let’s dive into the basics of adding a TMS FNC Data Grid to your C++ form.
Create a New C++ Project: Open C++Builder and create a new VCL or FMX project, depending on your target framework.
Add the Data Grid to the Form:
- Open the Tool Palette.
- Search for "FNCDataGrid" and drag the TTMSFNCDataGrid component onto your form.
- The grid will now be visible, and you can resize and position it as needed.
Step 3: Basic Grid Setup and Population
Now that you have the TMS FNC Data Grid on your form, let’s add some basic data.
Configuring Columns and Rows
The grid is flexible in how you manage its data. You can add rows and columns either programmatically or via design-time configuration.
Here’s how to add columns and rows programmatically:
void __fastcall TForm5::FormCreate(TObject *Sender)
{
// Set the number of columns and rows
Grid->ColumnCount = 5;
Grid->RowCount = 10;
// Define headers for the columns
Grid->Strings[0][0] = "ID";
Grid->Strings[1][0] = "Name";
Grid->Strings[2][0] = "Age";
Grid->Strings[3][0] = "Country";
Grid->Strings[4][0] = "Occupation";
// Add some sample data
Grid->Strings[0][1] = "1";
Grid->Strings[1][1] = "John Doe";
Grid->Strings[2][1] = "30";
Grid->Strings[3][1] = "USA";
Grid->Strings[4][1] = "Software Developer";
Grid->Strings[0][2] = "2";
Grid->Strings[1][2] = "Jane Smith";
Grid->Strings[2][2] = "25";
Grid->Strings[3][2] = "UK";
Grid->Strings[4][2] = "Graphic Designer";
}
Auto Sizing Columns
TMS FNC Data Grid can automatically resize columns to fit content, making your grid look polished without much manual intervention:
void __fastcall TForm5::FormCreate(TObject *Sender)
{
// ... other grid setup code ...
Grid->AutoSizeColumns();
}
This method adjusts the width of each column based on the content, ensuring a clean layout.
Step 4: Adding Interactivity: Sorting and Filtering
One of the strengths of TMS FNC Data Grid is its built-in interactivity features like sorting and filtering.
Sorting
You can easily enable sorting by clicking on column headers.
Grid->Options->Sorting->Enabled = True;
Filtering
To add filtering, you can use the built-in filter feature:
void __fastcall TForm5::FormCreate(TObject *Sender)
{
Grid->Filter->Add(1, "Jane*"); // Filter the 'Name' column for 'Jane'
Grid->ApplyFilter();
}
In this example, we filter the second column (Name) for rows containing "Jane".
Step 5: Exporting Data
Exporting the grid data to various formats is as simple as a single line of code. Here’s how to export to CSV:
Grid->SaveToCSVData("MyGridData.csv");
You can also export to other formats such as PDF or HTML, giving you the flexibility to share or store data in different formats.
Conclusion
The TMS FNC Data Grid is a powerful and flexible component for C++ developers, offering extensive features for displaying, managing, and interacting with data. Whether you're building a desktop, mobile or web application, this grid can handle a wide range of data scenarios while providing a sleek, modern user interface.
In this blog, we’ve covered the basics of setting up and using TMS FNC Data Grid, but its capabilities go far beyond what we’ve shown here. We encourage you to explore its features to fully unlock its potential in your applications.